Why MPPT beats PWM — the 15–30% harvest gap
A solar charge controller sits between your panels and your batteries and does one essential job: it takes whatever the panels produce and turns it into a safe charge for the bank. There are two ways to do that, and the difference is worth real money over a season.
PWM — the cheap way, and what it costs you
A PWM (pulse-width modulation) controller is essentially a fast switch. It connects the panel straight to the battery, which drags the panel's voltage down to whatever the battery happens to be sitting at. A 100W "12V" panel actually makes its rated power at around 18V; forced down to a 13V battery, the extra voltage is simply thrown away. You keep the panel's current but lose the voltage difference — and power is voltage times current. On a nominal 12V system the loss is real but modest; feed it a 60-cell "20V" residential panel and PWM wastes a third of the array before breakfast.
MPPT — the converter that recovers it
An MPPT (maximum power point tracking) controller runs a proper DC-DC converter. It lets the panel operate at its most efficient voltage — its maximum power point — and converts that higher-voltage, lower-current output into lower-voltage, higher-current charge for the battery. Nothing is thrown away; the surplus voltage becomes extra charging amps. In good midday sun the gain over PWM is 10–15%; in the low-light morning, evening, and overcast conditions where a cruising boat actually lives, the gain climbs to 25–30% because the MPPT can still pull useful power from panels a PWM unit would have collapsed.
The practical rule: use MPPT for any array above roughly 100W, and for any panel whose voltage sits well above your battery's — which is almost every modern 60- or 72-cell panel. PWM only still makes sense for a small trickle-charge panel deliberately matched to a 12V battery, where the price gap isn't worth closing. For everything else on a boat, MPPT pays for itself in harvest inside a season.
How to size an MPPT — reading the X/Y numbers
Victron names its controllers after the two numbers that actually govern the choice: a SmartSolar 100/50 accepts up to 100V of solar (PV) input and puts out up to 50A of charge. Get both numbers right and the controller is correct for your boat. Get either wrong and you either can't connect your panels or you leave harvest on the table.
The PV voltage number — don't let the array exceed it
Every panel has an open-circuit voltage (Voc) printed on its label. Panels wired in series add their Voc together; panels in parallel keep the same voltage. Take your worst case — all panels in series — add a 25% margin for cold weather (Voc rises as temperature drops), and stay under the controller's max PV rating. Two 22V-Voc panels in series is 44V, plus margin is ~55V, comfortably inside a 75V or 100V controller. Exceed the max PV rating even briefly on a cold, bright morning and you can destroy the controller, so this is the number to respect.
The output current number — match it to your array watts
Divide your total panel wattage by your battery voltage to get the peak charge current the controller must handle. A 400W array on a 12V bank is 400 ÷ 12 ≈ 33A, so you want a 40A or 50A controller. A 200W array is ~16A — a 15A controller is marginal, a 20A or 30A is comfortable. The controller will simply cap output at its rating if the panels ever over-produce, so slightly under-sizing is safe but wasteful; slightly over-sizing costs a few dollars and leaves room to grow.
Cruisers almost always add panels within a year or two. The price jump from a 30A to a 50A controller is small next to buying a second controller later, and the bigger unit runs cooler and lasts longer at the same load. When in doubt, buy one size up on the output number.
A quick worked example
Say you have two 175W panels (Voc ~22V each) feeding a 12V LiFePO4 bank. Wired in parallel: 22V of PV (any controller handles it), 350W ÷ 12V ≈ 29A of charge — a 40A Renogy Rover or a Victron 100/50 both fit, the Victron with room to add a third panel. Wired in series: 44V of PV, current halved to ~15A — thinner wire, earlier morning start, but one shaded panel drags the string. Same panels, two valid answers; the controller must cover whichever wiring you choose.
Three controllers compared, in detail
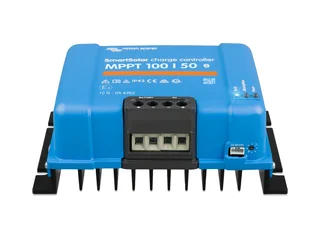
Victron SmartSolar MPPT 100/50 — the connected-boat default
This is the controller to buy if your boat has — or will have — a data system. The SmartSolar line is Victron's headline MPPT: built-in Bluetooth so you set it up and read it from the VictronConnect app with no extra hardware, and a VE.Direct port that is the real reason it wins here. That port feeds live panel voltage, charge current, yield-today, and battery state straight into a Signal K server, Home Assistant, or a Cerbo GX — which in turn puts it on the Victron VRM cloud portal and onto an NMEA 2000 backbone. The tracking is genuinely excellent in marginal light, the unit is 98% efficient, and the 100/50 has headroom for about 700W of panel at 12V, which covers most cruising arrays with room to grow. If you run any Victron gear already — a SmartShunt, a MultiPlus, a Cerbo — this drops into that ecosystem seamlessly. For a smaller array, the same controller exists as the 100/30 at lower cost; the only thing you give up is output headroom.
Strengths
- Built-in Bluetooth — setup and monitoring from your phone, no dongle
- VE.Direct out to Signal K, Home Assistant, Cerbo GX, NMEA 2000
- Excellent low-light and partial-shade tracking
- 98% conversion efficiency, runs cool at rated load
- Native fit with the rest of the Victron ecosystem + VRM cloud
Trade-offs
- No onboard display — you read it through the app (or a GX device)
- VE.Direct-to-USB cable and/or Cerbo GX are extra purchases for full integration
- Overkill if you never intend to read the data
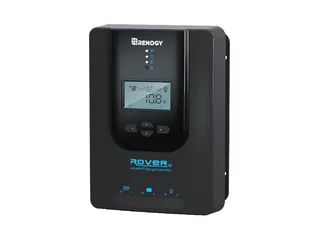
Renogy Rover Li 40A — the value pick
The Rover Li 40A (Renogy's current name for the Rover 40A) is a genuinely capable MPPT, and for a boat where the solar data doesn't need to live on the network it's a sensible buy — best when it's on sale, since Renogy's ~$206 list price (about $231 with the BT-2 module) is now roughly what Victron dealers charge for the 100/50. You get true MPPT tracking, selectable charge profiles including a proper LiFePO4 mode, a clear onboard LCD that shows harvest and battery state without any app at all, and 40A of output — good for roughly a 500W array at 12V. Bluetooth is available through Renogy's add-on BT-2 module, which pairs with the Renogy DC Home app for remote reads and configuration. The honest limitation, and the reason it's the value pick rather than the top pick on a connected-boat site: the data stays inside Renogy's own app. There's no native VE.Direct, no Signal K, no NMEA 2000 output. If your dashboard is your phone and Renogy's app, that's fine; if you want solar on the same screen as your batteries, AIS, and Starlink, you'll want the Victron.
Strengths
- 3-year materials and workmanship warranty
- Real MPPT tracking with a proper LiFePO4 charge profile
- Onboard LCD — read harvest and state with no app or phone
- 40A covers a ~500W 12V array
- Add-on BT-2 module for phone monitoring when you want it
Trade-offs
- No native Signal K or NMEA 2000 — data stays in Renogy's app
- Bluetooth is a separate purchase, not built in
- Tracking is good but a step behind Victron in marginal light
- IP32 enclosure — mount it in a dry locker, away from spray
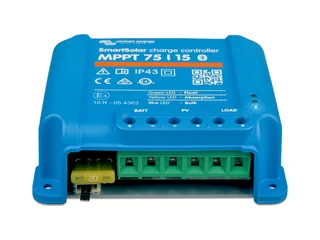
Victron SmartSolar MPPT 75/15 — small systems, same data path
Not every boat needs 50 amps of solar. A dinghy, a daysailer, a tender, or a modest weekender running a single 100–200W panel is better served by the 75/15 — and the reason to pick it over a generic cheap controller is that it carries the exact same connectivity as its big siblings. Built-in Bluetooth, a VE.Direct port, the same VictronConnect app, the same Signal K data path. So a small boat gets full monitoring and a proper LiFePO4 charge profile for around seventy dollars, and if you later expand the system, the app and workflow are already familiar. Watch the two limits: 75V max PV (a single panel or two low-voltage panels in series) and 15A output (about 200W at 12V). Step up to the 100/20 or 100/30 the moment you outgrow either.
Strengths
- Same Bluetooth + VE.Direct + Signal K path as the big SmartSolars
- Around $70 — cheap enough for a tender or second system
- Proper LiFePO4 profile and VictronConnect app
- Tiny footprint, easy to mount in a small electrical space
Trade-offs
- 15A / ~200W ceiling — you'll outgrow it if the array grows
- 75V PV limit rules out long high-voltage series strings
- VE.Direct cable is still a separate purchase for wired integration
Connected vs standalone — VE.Direct, Signal K, NMEA 2000
This is the section that separates a solar controller you install and forget from one that becomes part of the boat's nervous system. Every controller here charges batteries. The question is whether you can see it doing so from wherever you look at everything else.
Bluetooth — the baseline everyone should have
Both Victron SmartSolar models have Bluetooth built in; the Renogy adds it with the BT-2 module. Bluetooth gets you the essentials: set the charge profile, watch today's harvest, check the battery state from your phone standing at the panel. It's local, it's free of extra wiring, and for many boats it's enough. What Bluetooth doesn't do is put the data anywhere permanent or share it with your other instruments.
VE.Direct — the wire that reaches the boat network
The VE.Direct port on the Victron controllers is the difference-maker. A single VE.Direct-to-USB cable into a Raspberry Pi running Signal K, or into a Home Assistant box, streams the controller's full data set — PV voltage and power, charge current, yield today and lifetime, charge state — into a system that logs it, graphs it, and shows it alongside your batteries, tanks, AIS, and Starlink. There's no cloud dependency and no subscription; the data is yours, on the boat.
Cerbo GX and NMEA 2000 — the whole-boat view
Add a Cerbo GX and the same VE.Direct data lands on the Victron VRM cloud portal — remote monitoring from anywhere the boat has internet — and, via the Cerbo, onto an NMEA 2000 backbone so a chartplotter or MFD can display solar harvest on the helm. This is how you get one screen that shows solar in, loads out, and battery state of charge together. Renogy has no equivalent path; its data stops at the app. For a boat already running Signal K or a Victron system, the connected controller isn't a luxury — it's the piece that makes the solar array visible next to everything else.
For the full picture of how these feeds come together on a boat, see our Signal K explained guide and the Home Assistant marine setup guide.
Charge profiles — LiFePO4 vs AGM settings
An MPPT controller can only charge correctly if it's told what battery chemistry it's feeding. This is a one-time setting during install, not a hardware choice, but getting it wrong quietly undercharges the bank or slowly cooks it.
Set the chemistry, then verify the voltages
Every controller here has selectable presets. Pick LiFePO4 (or AGM/GEL/flooded, whichever you run) and the controller loads sensible defaults. Then confirm the actual numbers against your battery maker's spec:
- LiFePO4 — roughly 14.2–14.4V absorption, 13.5V float, and no equalization. Equalization is a deliberate lead-acid overcharge cycle; run it on lithium and you damage the cells. On a Victron you can select the LiFePO4 preset in VictronConnect or dial in an exact custom profile.
- AGM — around 14.4V absorption, 13.6V float, no equalization. AGM is sealed and must not be equalized either.
- Flooded lead-acid — about 14.6V absorption, 13.5V float, with periodic equalization at ~15.5V to balance cells.
Temperature compensation
Lead-acid batteries need their charge voltage nudged with temperature — higher when cold, lower when hot. A battery temperature sensor lets the controller do this automatically, which matters on a boat that sees both a Maine spring and a Bahamas summer. LiFePO4 doesn't want voltage compensation, but it does need a low-temperature charge cutoff — never bulk-charge lithium below freezing, as it plates the cells permanently. Most quality controllers and BMSs handle this cutoff; confirm yours does before the first cold morning.
Wiring & install — fusing, cable, mounting
An MPPT install is straightforward, but a boat is a wet, vibrating, salt-laden environment, so the marine details matter more than they would on a shed roof.
Fuse on the battery side, close to the terminal
Put a fuse on the battery-to-controller cable, within a few inches of the battery positive terminal, sized just above the controller's rated output — a 50A controller wants a 50–60A fuse. That cable is the one that can carry a dangerous fault current from the bank, so it's the one that must be protected. A fuse on the PV (panel) side is optional for a single string but becomes required once you parallel multiple panels, to protect each panel's wiring against back-feed.
Cable, connectors, and voltage drop
Size the wire for your maximum current and run length with a 3% voltage-drop budget — undersized cable literally throws away the harvest the MPPT worked to recover. Use marine-grade tinned copper (a marine solar wire kit saves sourcing it piecemeal), MC4 connectors at the panels, and crimp every terminal with a proper tool and heat-shrink — ABYC prohibits soldered power connections on a boat because vibration fatigues them. Keep the PV wiring runs short and the panel-to-controller path as direct as practical.
Mounting the controller
Mount the controller vertically in a dry, ventilated space with clearance above and below for airflow — MPPT controllers dump heat at high output and will throttle if they cook. Keep it as close to the battery as the fuse rule allows to minimize the high-current cable run, and well away from the bilge and any spray. Then commission: set the chemistry, verify the absorption and float voltages, confirm the low-temperature cutoff, and watch a full charge cycle to make sure the numbers behave.
For the panels-and-sizing side of the array, see our solar power for smart boats guide; for the batteries the controller feeds, the lithium house bank guide; and for watching it all, the battery monitor guide.
Frequently asked questions
What does MPPT mean, and is it worth it over PWM on a boat?
MPPT stands for Maximum Power Point Tracking. A PWM controller simply connects the panel to the battery, dragging the panel down to battery voltage and wasting the difference. An MPPT controller runs a DC-DC converter that lets the panel operate at its most efficient voltage and steps that down to charging current, recovering 15–30% more harvest — most of it in the low-light morning, evening, and cloudy conditions where a boat needs it most. On any array above about 100W, or any panel whose voltage is well above 12V (most 60- and 72-cell panels), MPPT is worth it. The only case for PWM is a tiny trickle-charge panel matched to a 12V battery, where the price difference is not worth recovering.
How do I size an MPPT charge controller for my boat?
Two numbers govern the choice, and Victron names its controllers after them: 100/50 means 100V maximum PV input and 50A charge output. First, the PV voltage: add up the open-circuit voltage (Voc) of your panels in series, add a 25% cold-weather margin, and stay under the controller's max PV rating. Second, the output current: divide your total panel watts by battery voltage to get the maximum charge amps (400W of panel at 12V is about 30A), and pick a controller rated at or above that. Size for the array you might grow into, not just the one you have — the jump from a 30A to a 50A controller is small money and saves a second purchase later.
Can a Victron SmartSolar MPPT send data to Signal K, NMEA 2000, or Home Assistant?
Yes — this is the reason it is our top pick for connected boats. Every Victron SmartSolar has a VE.Direct port. A VE.Direct-to-USB cable feeds the controller's live data (panel voltage, charge current, yield today, battery state) straight into a Signal K server or Home Assistant. A Cerbo GX turns the same data into the Victron VRM cloud portal and onto an NMEA 2000 backbone. Built-in Bluetooth also lets the VictronConnect app read and configure the controller from your phone with no extra hardware. Renogy's Rover exposes data too, but only over its own BT-2 Bluetooth module and app, without native Signal K or NMEA 2000 output.
Do I need to change the charge profile for lithium (LiFePO4) batteries?
Yes, but it is a one-time setting, not a hardware change. Every MPPT controller worth buying (Victron SmartSolar, Renogy Rover, EPEVER Tracer) has a selectable LiFePO4 profile. Set it during install: roughly 14.2–14.4V absorption, 13.5V float, and no equalization stage — equalization is a lead-acid maintenance cycle that damages lithium. On a Victron you can pick the preset LiFePO4 profile in VictronConnect or dial in an exact custom profile to match your battery maker's spec. Get this wrong and you either undercharge the bank or hold it at too high a voltage; get it right once and the controller does it correctly forever.
Can I connect two solar panels to one MPPT controller in series or parallel?
Either, and the choice matters on a boat. Series adds the panel voltages (two 20V panels become 40V), which keeps current low, lets you use thinner wire, and helps the MPPT start earlier in dim light — but if one panel is shaded by the boom or a stay, it drags the whole string down. Parallel keeps voltage the same and adds current, so partial shading only costs you the shaded panel — better for a deck where shadows move across the array all day, but it needs heavier cable and a fuse or combiner on each panel. For most cruising decks with rigging shadows, parallel (or a controller per panel) is the more forgiving choice.
Where does the fuse go on an MPPT solar install, and what size?
You want a fuse on the battery side of the controller, close to the battery positive terminal, sized just above the controller's rated output current — a 50A controller wants a 50–60A fuse. This protects the battery-to-controller cable, which is the one that can carry a dangerous fault current from the bank. A fuse on the PV (panel) side is optional for a single string but required once you parallel multiple panels, to protect each panel's wiring. Match wire gauge to the current and run length with a 3% voltage-drop budget, use marine-grade tinned copper, and crimp — never solder — every terminal, per ABYC.
The short version, by profile
Connected boat, or one you're building toward: Victron SmartSolar MPPT 100/50. ~$195, built-in Bluetooth, VE.Direct out to Signal K / Home Assistant / Cerbo GX, headroom for a 700W array. The one controller here that puts solar on the same screen as the rest of the boat. Drop to the 100/30 if your array is smaller.
Best value, data can live in an app: Renogy Rover Li 40A. ~$206 at Renogy’s list price, real MPPT tracking, LiFePO4 profile, onboard display, Bluetooth via the BT-2 module. Worth it when discounted below the Victron or when you want a display on the unit — you give up native Signal K and NMEA 2000.
Small system — tender, daysailer, single panel: Victron SmartSolar MPPT 75/15. ~$70, same Bluetooth and VE.Direct connectivity as the big models, sized for a 100–200W panel. Full monitoring on a small boat for pocket money.
The general rule: buy the right output amps for your array (watts ÷ battery volts, then round up), respect the max PV voltage, and — on a boat with any kind of data system — choose VE.Direct. The controller is cheap next to the panels and batteries around it; the connected one is what makes the whole array visible.